Selling a product or service to someone who doesn’t know you or trust your brand is hard. And if you’re relying on paid advertising to do the job for you, it can also be really expensive.
When a potential customer first visits your website, they’re looking for signs that your business is trustworthy and good at what you do.
But it’s not always possible to persuade someone of this in one visit. Instead, you need to build a relationship with potential customers.
And this is where an email course comes into play.
Page Contents
What is an email course?
An email course is a sequence of educational content delivered to a recipient’s inbox at regular intervals. Each email in the sequence constitutes a lesson and each lesson covers a theme related to the main course topic.
Email courses vary in length and are delivered over a specified period of time with a clear end to the course. For them to be considered a ‘course’, they should be at least a few – a minimum of five emails is a good place to start.
What are email courses used for?
The goal with an email course is to teach your audience about a particular topic while aligning your brand with that topic and eventually leading your audience to a call-to-action or conversion. That might be a sale if you’re an ecommerce brand, a consultation booking if you’re a consultant, or a free trial if you’re in the SaaS industry.
Some content creators sell email courses to customers as part of their offering of digital products. But what we’re focusing on here is a free email course used as an incentive to get a website visitor’s contact details. This is often referred to as a lead magnet.
Why create an email course – three compelling benefits
If you sell a product or service, chances are you could benefit from creating an email course to use as a lead magnet. Here’s why.
1. An email course generates new leads
A lead, a prospect, a potential customer – the name might change but they all boil down to the same thing. However, before a person becomes a lead, they often start their journey as a website visitor.
And if a website visitor is going to give you their email address and willingly accept your future marketing communications, they need a good reason to do so. Receiving an email course that teaches them something valuable is a good reason.
Which is why email courses can convert more of your website traffic into subscribers and generate quality leads. This, in turn, grows your audience of potential customers and increase opportunities for sales.
2. An email course can nurture leads
With each email in an email course, you’re familiarising your subscribers with your brand. And if you do it right, you’re showing the value your business offers so that when the time comes for that subscriber to make a purchase, you’ll be the first one they think of.
This is often described as ‘lead nurturing’ – taking a cold audience and warming them up to your sales offer. And an email course is an unobtrusive way of doing that – after all, with email, subscribers have invited you into their inbox. You’re not following them around the internet uninvited like with paid advertising.
With a sequence of emails you have a chance to build credibility and trust with your audience, which helps accelerate the sales process. Plus, it increases long-term engagement with your brand.
3. An email course is low risk and saves you time
After the initial investment of creating the content for your course, an email course will actually save you time in the long-run. That’s because you set up your email course with an automation tool, which means the emails are delivered on autopilot.
It’s a good idea to regularly check on how each email within your course sequence is performing so that you can make any necessary adjustments. But aside from that, once it’s set up you don’t need to worry about creating new content.
And you can use your email course as a litmus test for creating more content around your chosen topic. This saves the risk of going all-in on an expensive content project without validating your idea first.
Step-by-step beginner’s guide to creating an email course
So now that we’ve seen what an email course is and why you might benefit from creating one, it’s time to jump into what’s needed to get one up and running.
Step 1: Make sure you have the right tools
Before you start creating your email course, you need to ensure you have the right tools for the job. And for that you’ll need the following:
- Email marketing tool – this is what you’ll use to create the emails in your email course and deliver them to subscribers.
- Landing page builder – if you already have a website then you won’t need this additional tool. You can instead create a new page on your website to host the sign-up page for your email course. However, if you don’t have a website, you can use a landing page builder instead.
- Opt-in form toolkit – this will enable you to add multiple opt-in forms across your website and, in some cases, run A/B tests to improve conversion rates.
It’s possible you already have all of these tools. And if you’re already using an email marketing tool, then landing pages and opt-in forms will be part of the package.
For example, with EmailOctopus you can create great-looking emails for your email course, build a landing page for promoting your email course, and generate opt-in forms for collecting new subscribers – all in one low-cost package.
If you’re starting from scratch and don’t already have a toolkit then have a look at the email marketing tools out there to see which one best suits your needs and budget.
Step 2: Think about what your target customers would find most valuable
To create an email course that will grow your audience, the content of the course needs to be valuable to your target audience. Which makes the task of choosing the topic of your email course one of the most important steps in this process.
The email course topic needs to resonate with your target customer – people need to be interested enough to provide their email address in exchange for your content.
To begin, brainstorm ideas and aim to have a list of topics to choose from.
Here are some ideas to get you started:
- SaaS brands – you could create an email course that teaches your audience about the topic your software provides a solution for. For instance, EmailOctopus (that’s us) could create a beginner’s guide to email marketing.
- ecommerce brands – with an email course you can teach potential customers about a topic related to your product. For example, if your business sells knitting materials and equipment, you could create an email course on how to improve your knitting skills.
- Beauty brands – hair salons, make-up artists and aestheticians all have something they could teach potential customers, whether that’s how to achieve five easy hairstyles or how to apply make-up professionally.
- Restaurants, cafes and food bloggers – you could share some of your old recipes or provide cooking tips to help people become a better cook.
- Financial services – you could teach your audience the fundamentals of personal finance with tips on how to spend less and save more.
When it comes to deciding the topic to move ahead with, survey your customers. You could either email your existing database to ask what topic they’d prefer to learn more about. Or you could ask your followers on social media.
It’s a good idea to validate your topic ideas with people who are already customers so you know what will best attract similar people.
Step 3: Decide on your goal
Not only does the topic of your email course have to be appealing to your audience, it also needs to be relevant to your end business goal, whether that’s selling a product or a service.
So consider what you are hoping to achieve by creating this email course. Growing your mailing list is one goal, but it shouldn’t be the only goal.
What do you want subscribers to do during the course and once it’s been delivered?
If you want subscribers to make a purchase, how will you use your email course to encourage this action?
Here’s how Patch Plants does it with their Houseplant Parenting email course:
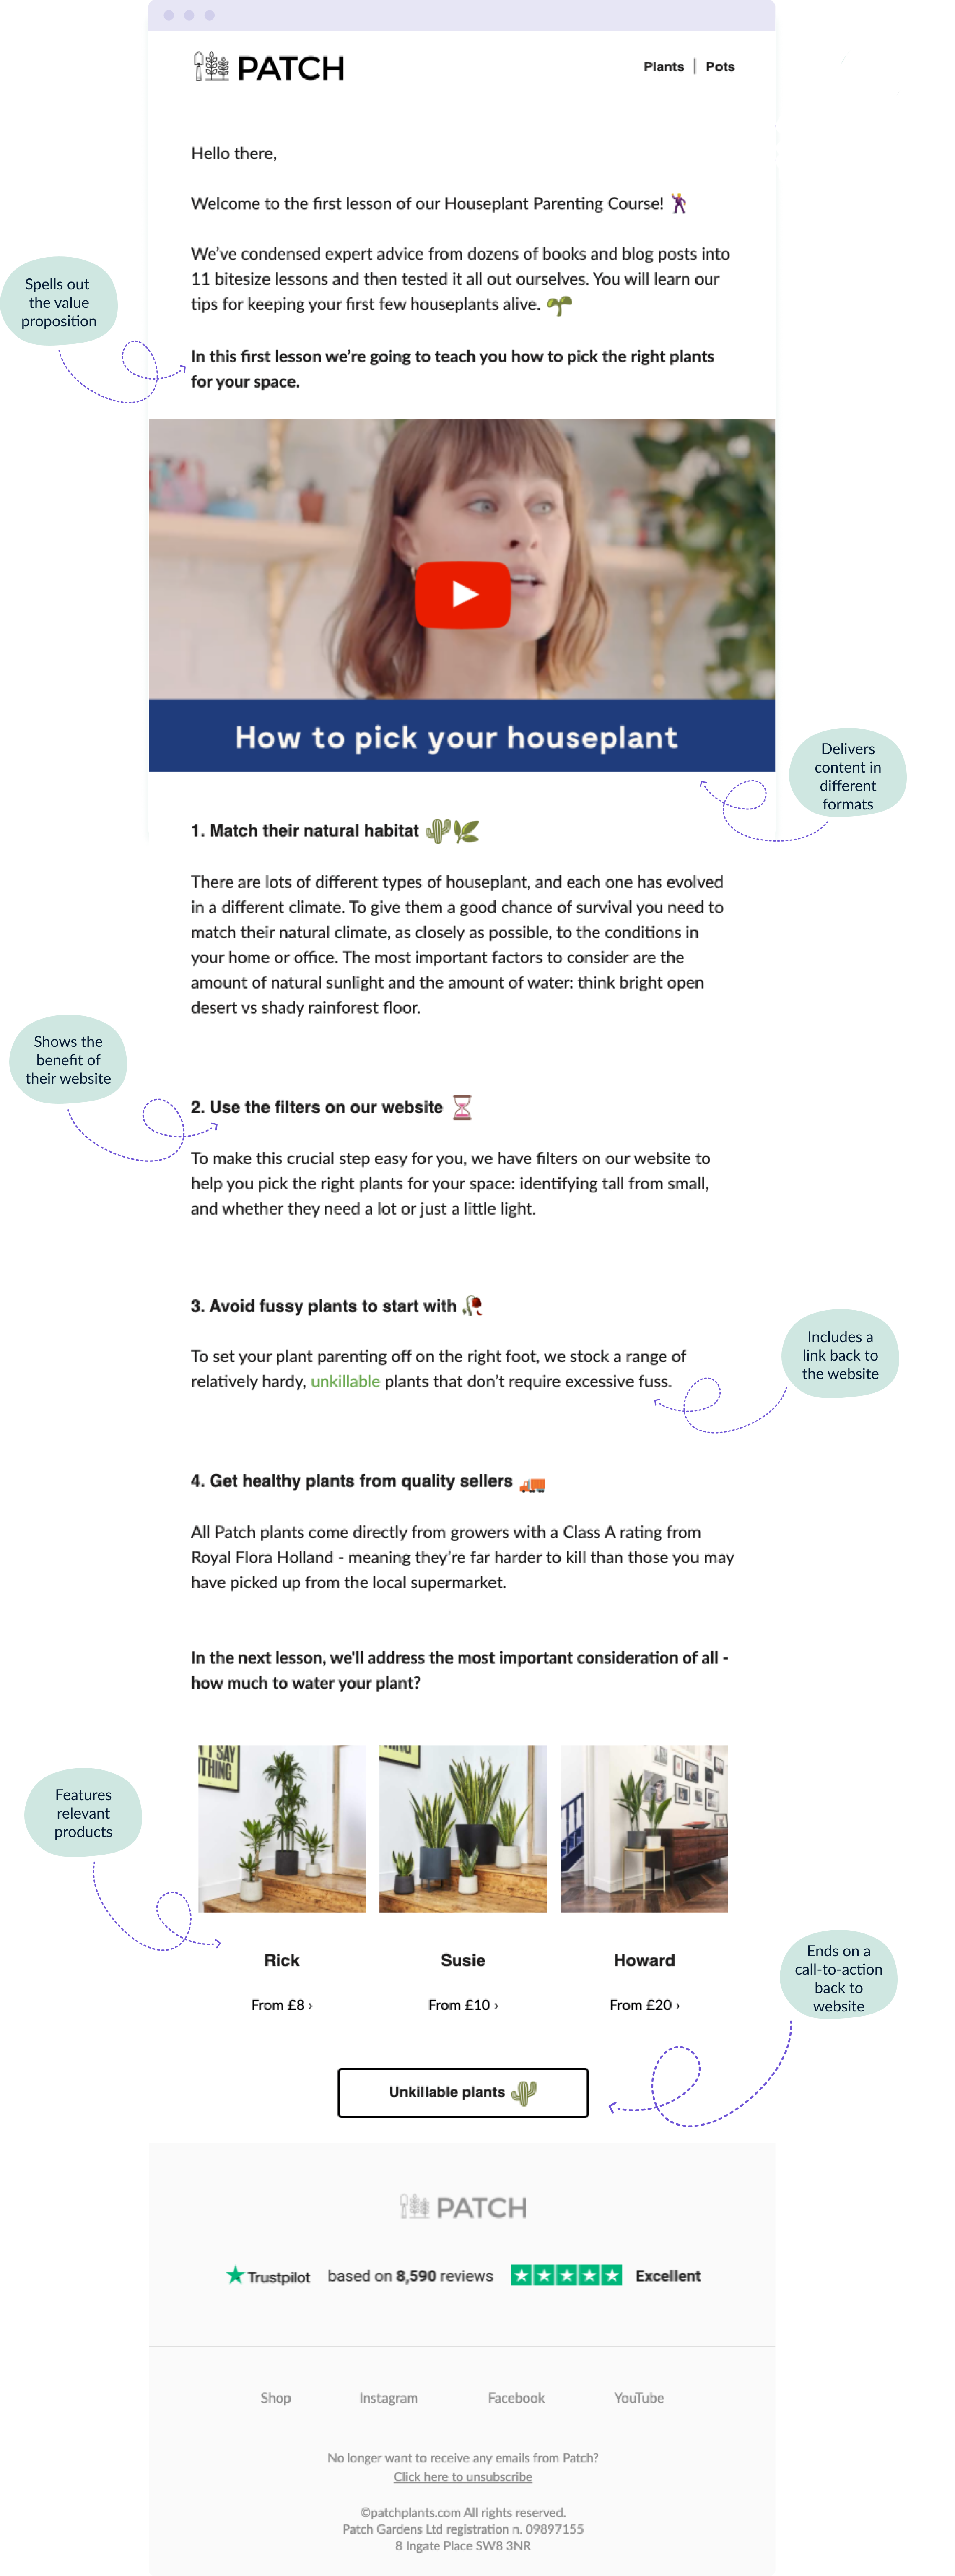
In this email, Patch Plants delivers value to subscribers by teaching them how to choose the right plants for their space. And at the same time subscribers are encouraged to view relevant products on the Patch Plants website.
Essentially Patch Plants are telling subscribers this is what you need to do to be successful and we’ve already done the hard work for you – all you need to do is buy this recommended product.
It’s a great way of selling without being pushy.
Knowing your own business goal will help you decide on your final call-to-action when the email course comes to an end. It will also help you determine whether the course has been successful.
Step 4: Map out your sequence
Once you know the topic you’re going to cover, it’s time to break that down into a sequence. You’ll need to decide the best number of emails to include in your course and the frequency at which you’ll send these emails to subscribers.
Plan this before you start building the individual emails. At this point, all you need is a skeleton of each email – a heading and a few sub-headings so you can see how it all fits together.
It’s a good idea to start your sequence with a welcome message to greet new subscribers and get them excited for what’s to come. Set out expectations so they know when to check their emails for the content they’ve signed up for. Your welcome message should be sent the moment a new subscriber signs up for your email course.
You should also carefully consider the final email in your sequence:
- How will you convert these subscribers into customers?
- What CTA will you be leading up to?
- How will you continue to communicate with these subscribers after they have finished your email course?
- Do you want to survey these subscribers at this point and collect feedback?
Your first and last email are going to be the most important – the first needs to ensure subscribers look forward to what’s to come. And the last email needs to move subscribers further along the sales funnel.
Here’s what a possible email course sequence might look like:
The welcome email
Thank registrants for signing up, explain when the first lesson is due and what else they can expect from the course. Send this email as soon as a subscriber signs up to receive your email course.
The email lessons
After the welcome email, dive straight into your first lesson. You should send this on the same day a subscriber joins the course so they don’t have to wait long to access the content.
Continue to deliver a new email lesson each day for the duration of the course. Or across whatever frequency you plan to space out each lesson.
The sales pitch
The penultimate email in your email course sequence is the best time to generate interest in your product or service. By this point, you should have delivered loads of value so that your audience is receptive to your sales pitch. Just remember to tie your sales pitch back to the topic and combine the message with even more valuable content.
The wrap up email
Once the lessons are done, summarise what your subscribers have learned during the course – this reminds them of the value you’ve given them and builds a positive brand image.
And use this final email to explain to your audience what happens next – let them know how often they’ll be hearing from you and what new content they might receive.
How long should an email course be?
This is a bit like asking how long’s a piece of string. The answer is, it depends.
If you plan to educate your audience on a particularly complex subject, then you might need to create a longer email course spanning a few weeks.
On the other hand, if the topic is relatively simple, you might only need a few emails.
However, it’s good to aim for at least five emails so that your audience feels as though they got a complete course and enough valuable content that they feel confident in the topic they’ve been learning about. Any less than this and they might feel disappointed.
And in terms of frequency, it’s a good idea to send one lesson per day at a similar time. This creates a routine so subscribers know when to expect your emails. It also stops subscribers from forgetting about the course in between lessons.
Step 5: Start creating the emails in your sequence
Now that you have a structure for your email course in place, it’s time to start creating the individual emails.
If you’ve already covered your chosen topic in depth on your company blog or website, you can repurpose this content for your email course.
If not, allocate the resources needed to writing your email course from scratch – whether that’s in-house among your team or externally via a freelancer or agency.
When it comes to writing the copy for your email course, follow these tips:
➡️ Break each email up into manageable sections using headings
➡️ Keep paragraphs short – you don’t want to overwhelm readers with too much text
➡️ Add lesson numbers in your subject lines and in the main heading of each email so that your subscribers know where they are in the course
➡️ Include a teaser of what’s to come in each lesson so that subscribers are excited for the next lesson
➡️ Remember that the primary goal of each email is to educate your audience so avoid being too promotional and instead focus on delivering value to your readers
As with any good copy, aim for succinctness. Provide the most amount of value in the least number of words. Your audience might have signed up for the course but that doesn’t mean they want to spend half an hour each day getting through the content.
What’s a good word count to aim for?
If you’re opting for a shorter course with more content in each lesson, 500 words is a good benchmark. As an example, the average word count across Email Mastery’s 7-day email course is 619 words with a minimum of 485 words and a maximum of 785 words.
If you’re creating a longer course with more emails in the sequence, you might get away with as few as 50 words. That’s what Rob Hope does with his 100-day course of daily tips on landing page optimisation. On average, his emails are just 86 words in length, which is ideal for a daily tip course format.
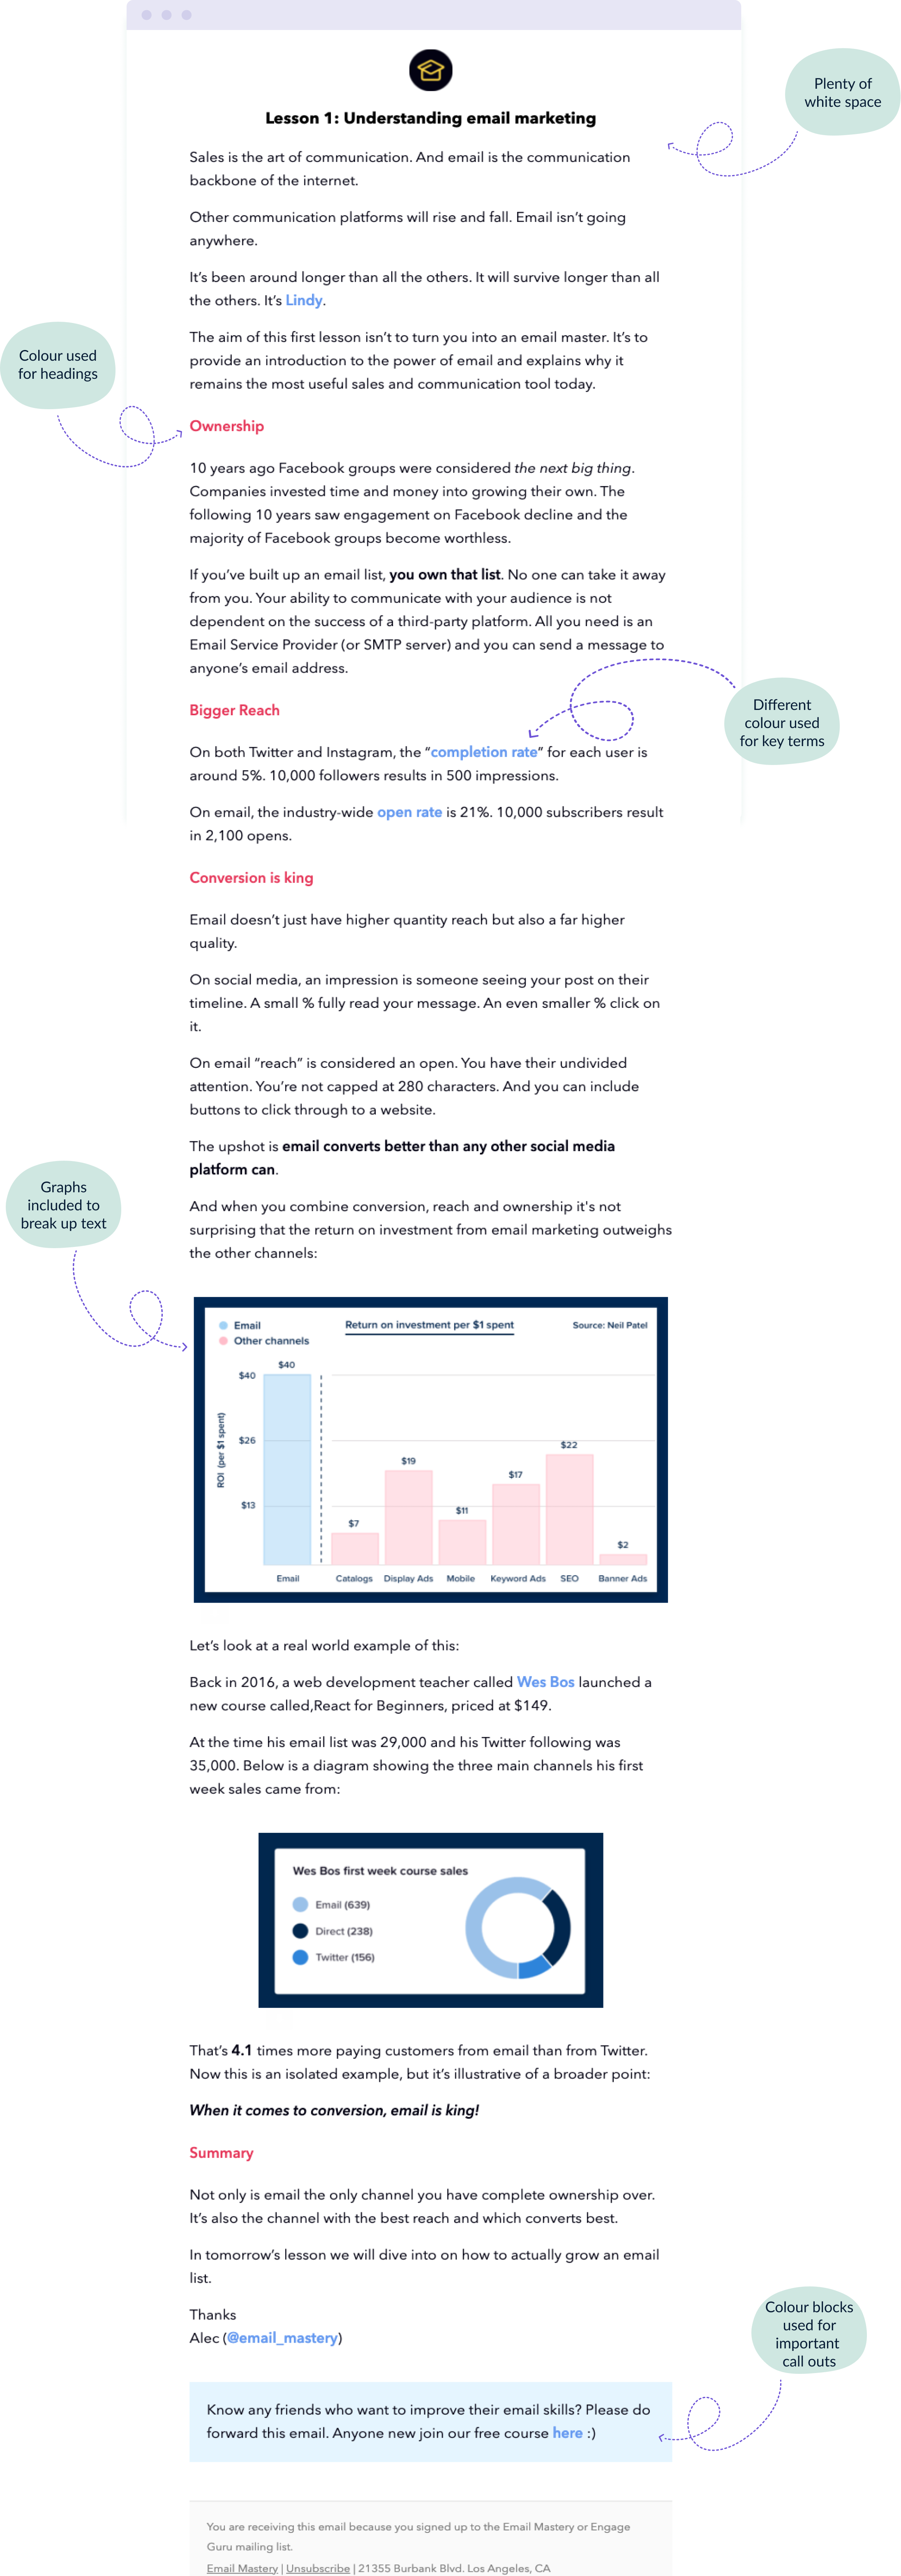
How to format the emails in your email course
Once the content of your emails is ready to go, it’s time to think about what each email will look like.
Never underestimate the importance of good email design – your emails should look as good as the quality of the content you’re delivering to subscribers.
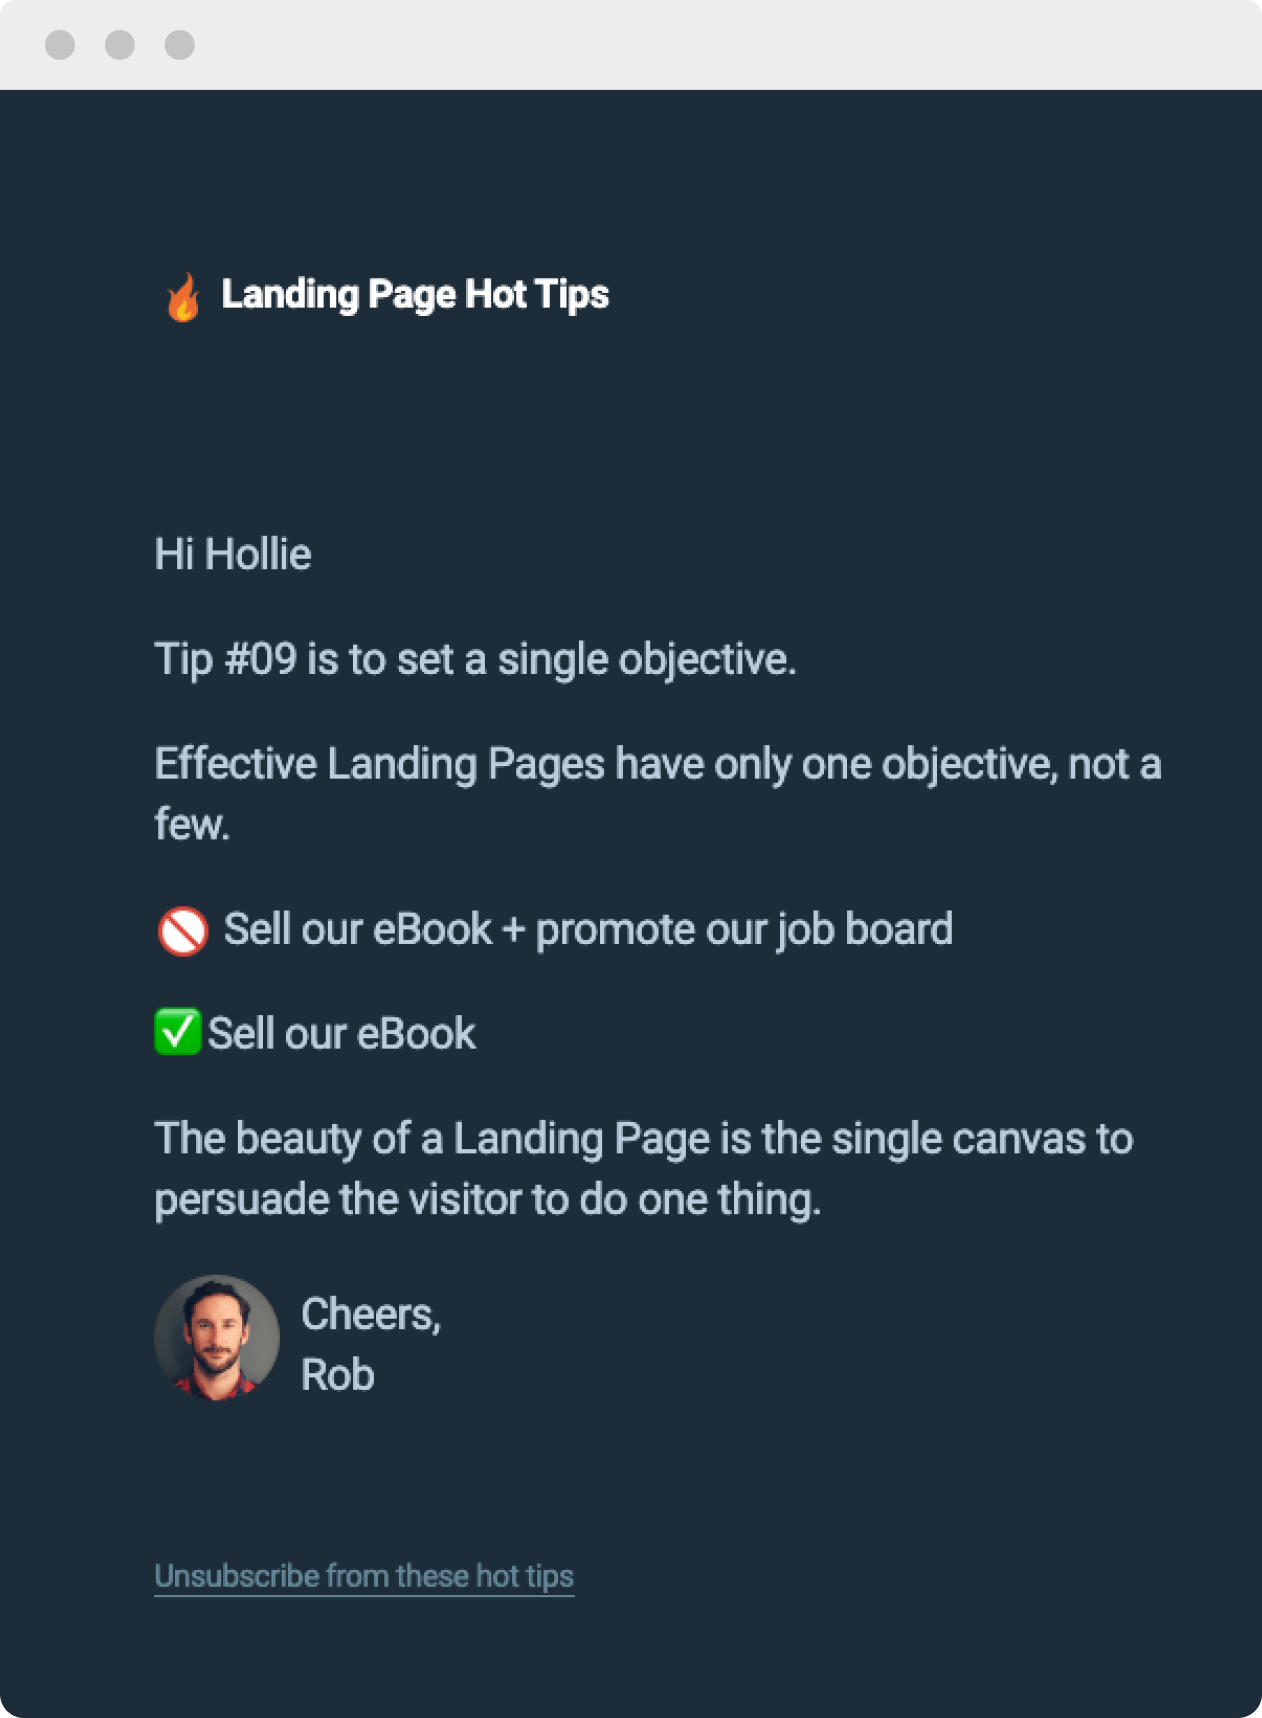
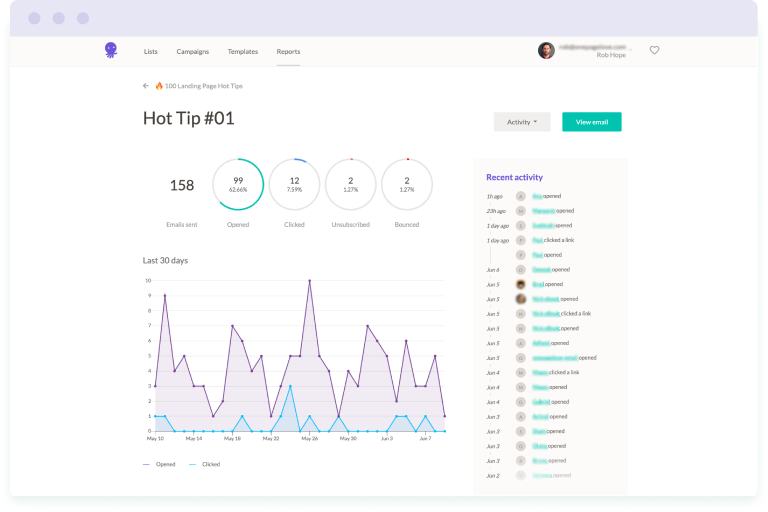
Rob Hope’s Landing Page Hot Tips emails (see image above) are unusual in the use of a dark background with light text. However, this makes the One Page Love brand more distinctive and mirrors the style of the website.
Most email course creators prefer to opt for a plain white background with black text. But to keep things interesting, you should include images where they help illustrate a point.
You can also create visual interest by using different colours for your sub-headings and using bold to highlight key points.
Here’s how Email Mastery does it:
Step 6: Design a compelling opt-in form
Now that you’ve prepared the content for your email course and your sequence is ready to go, you need to make it possible for website visitors to sign up for the course. And to do this, you need a compelling opt-in form.
To be compelling, your opt-in form should persuade your target audience that they need your email course or that they will benefit from signing up. You can create this persuasion by explaining the value your email course delivers and by including some form of social proof, a powerful marketing psychology hack.
Here’s how Email Mastery does it:
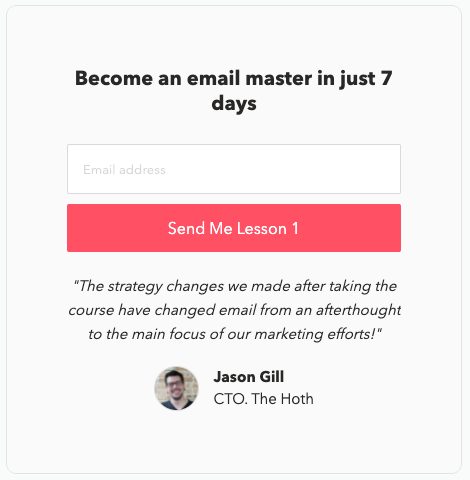
This opt-in form appears on nearly every page of the Email Mastery website, either as a footer bar or a sidebar next to long-form articles. And this is why it works:
- The value proposition is clear and specific – visitors know exactly what they’ll be getting by signing up (becoming an email master) and how long it will take (just 7 days)
- There’s minimal friction – all you need to do is enter your email address
- The CTA is personal and enticing – the use of the first person pronoun ‘me’ speaks directly to the visitor and rather than a boring “sign up for the course”, the call-to-action expresses what subscribers will get by clicking that red button
- It includes social proof – the quote from someone who previously signed up for the course helps build trust and credibility
Types of opt-in form you can use to promote your email course
Email Mastery is an example of a static opt-in form placed in the sidebar and footer sections of the website.
But there are other options you might want to consider, including:
- Exit intent pop-up form – this type of form appears when a website visitor is showing signs of leaving your website. These forms can be a great way of capturing contact details before a visitor is lost forever.
- Lightbox pop-up form – this type of form is similar in appearance to an exit intent pop-up form but the difference is when this form appears. With a standard lightbox pop-up form, you can set it to display a few seconds after a website visitors has landed on your site.
- Floating bar – as the name suggests, this is a form that occupies the width of the web page and sticks to either the top or bottom of the page. It remains visible as your visitors scroll down the page without disturbing them.
Tools like OptinMonster, Ninja Forms and Poptin make it easy to create a variety of opt-in forms for your website. So take a look at what’s possible and experiment with different types of forms. You might find one converts better than others.
Step 7: Design a separate landing page
In order to start collecting subscribers for your email course, opt-in forms are an essential addition to your website. But you also need a dedicated landing page where you can direct traffic to.
After all, if you’ve gone to the effort of creating an email course, it seems a waste to just wait for people to come to you and find it. Instead, go out there and promote it.
But to do that that you’ll need a landing page. You can link to this page from your social media channels for greater reach. And you might also consider paid ads if you want to grow your mailing list quicker.
When designing your email course landing page, you’ll need to think about:
- The URL – it’s a good idea to make your URL something like: www.[your-domain].com/[name-of-your-email-course] and include the words “email course” on the off chance people are looking for this exact type of content.
- The copy – what text you’re going to include on the page. At the very least you’ll need a heading and a summary paragraph to explain why people should sign up and what they should expect from the email course.
- The design – the look of your landing page should marry with the look and design of the emails in your email course, and should be consistent with your branding.
If you want a masterclass in how to design a landing page for your email course, look no further than Landing Page Hot Tips:
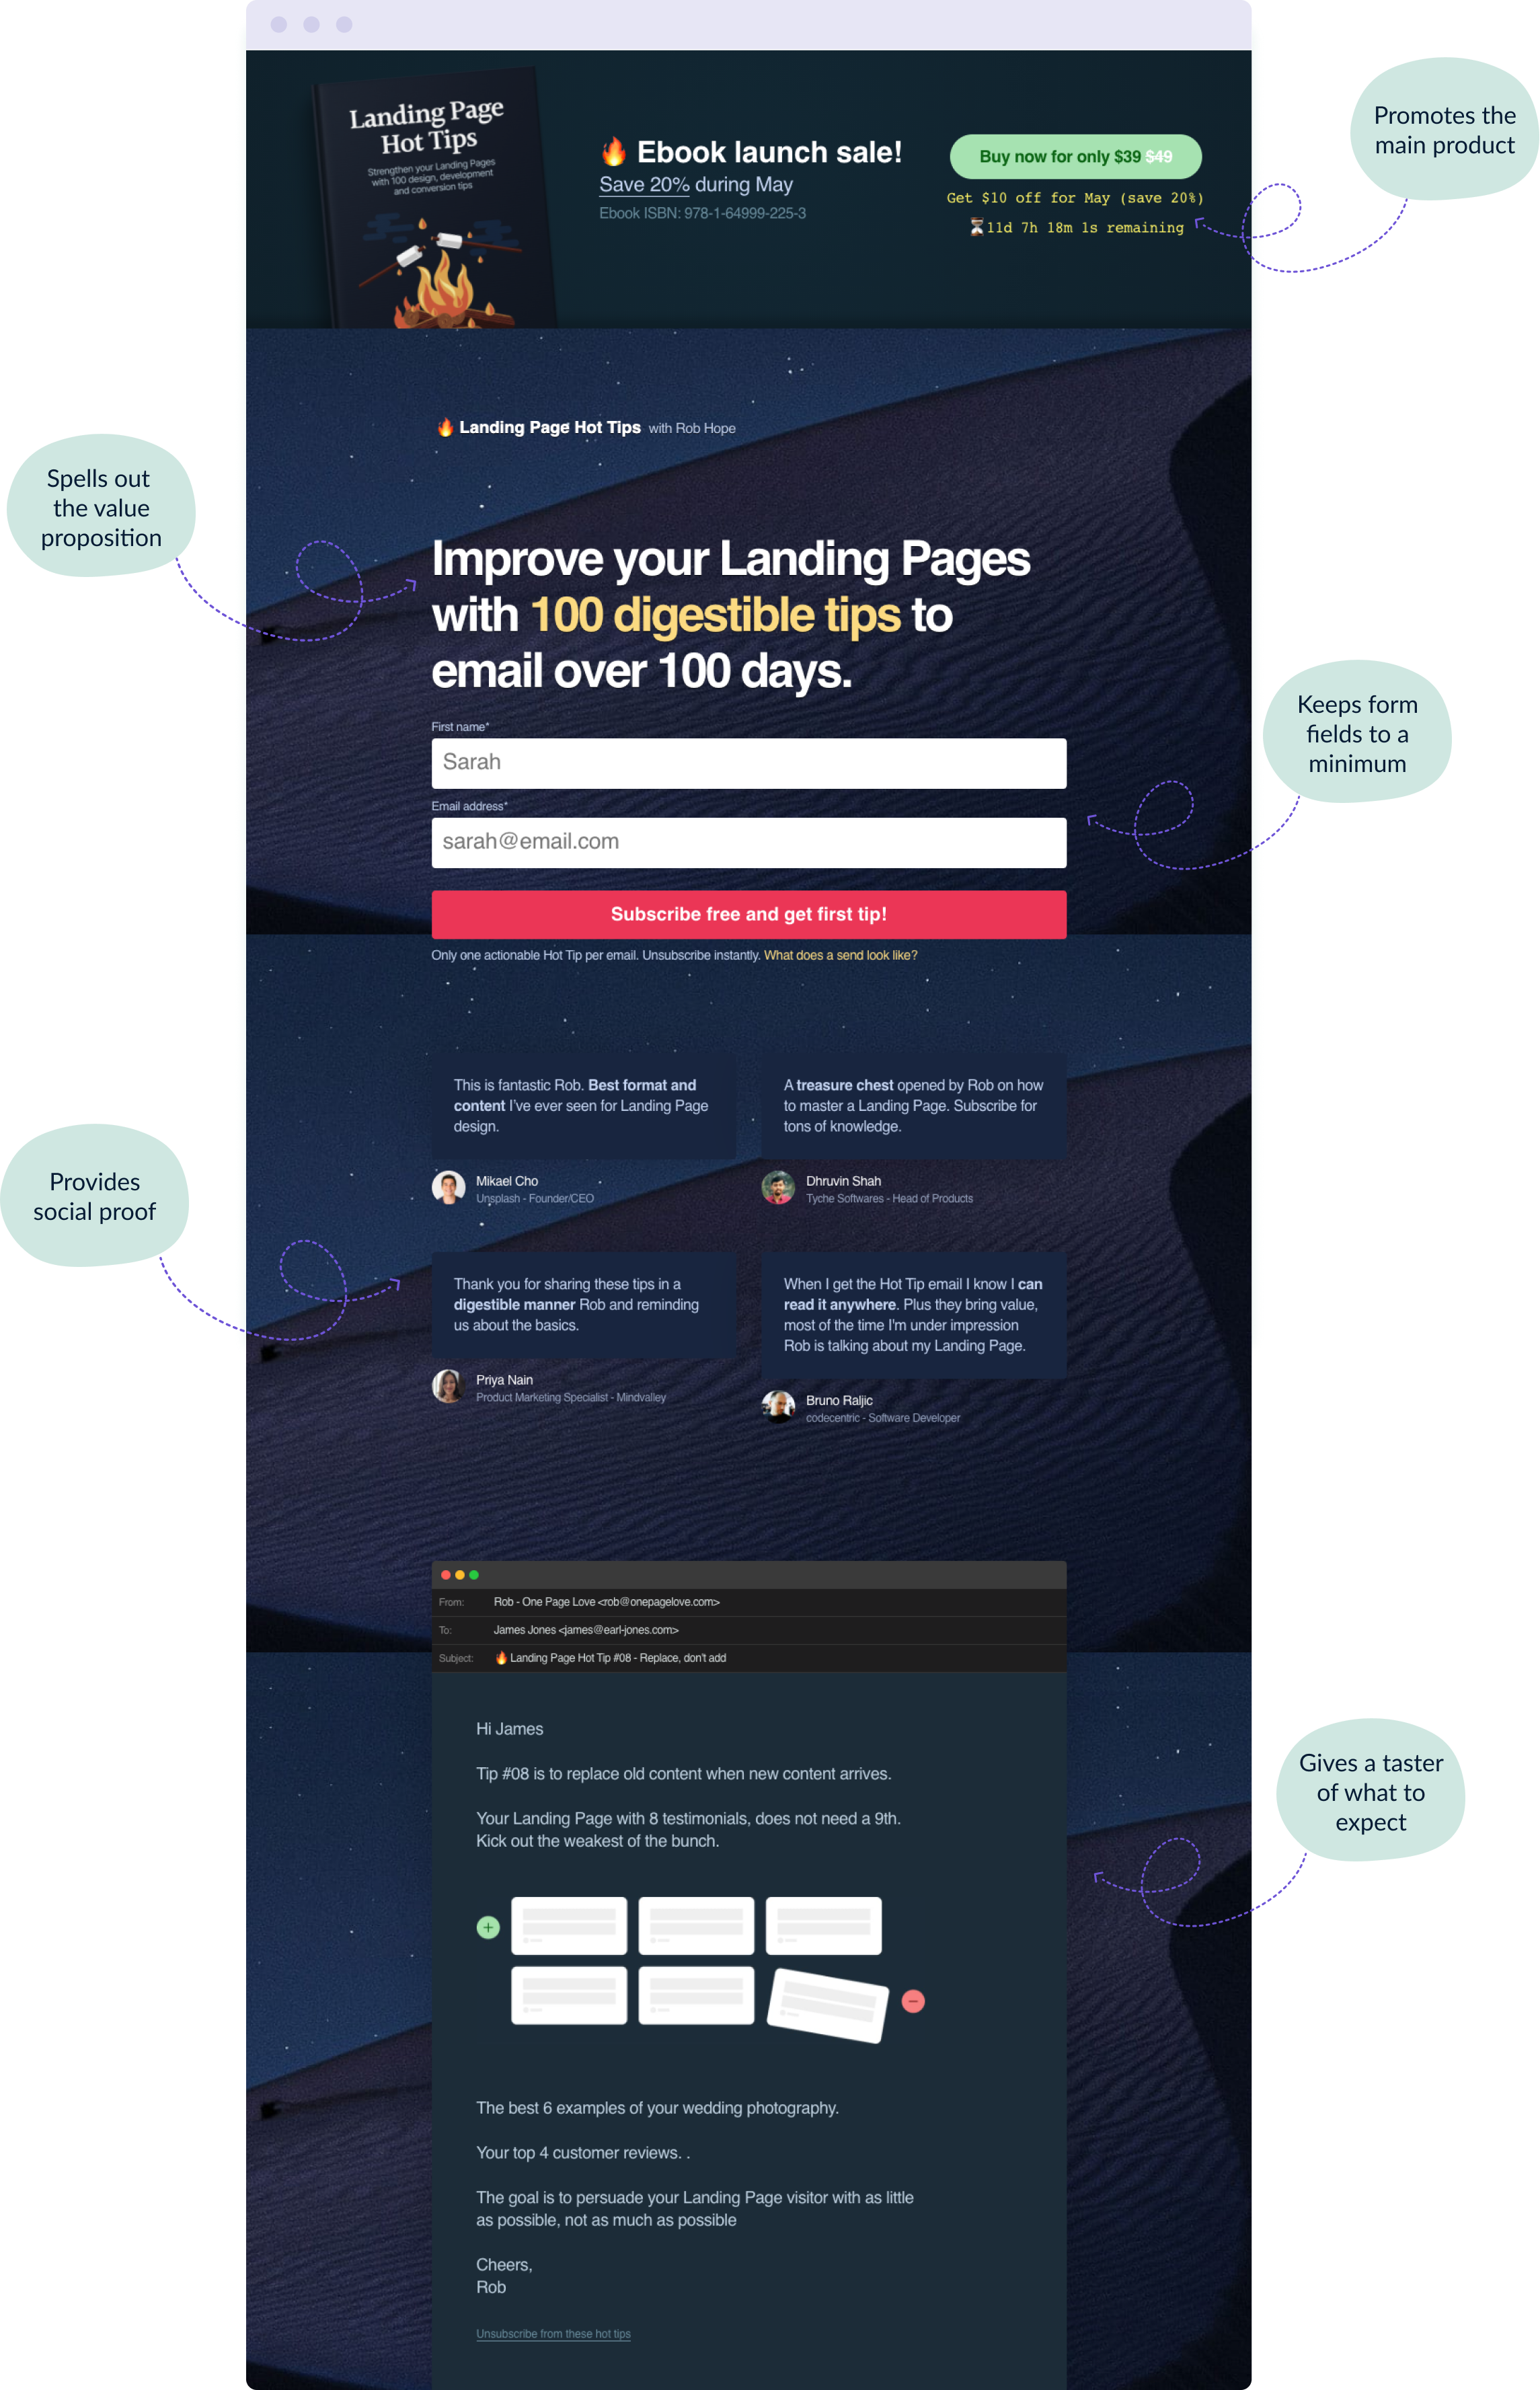
Here’s what makes this landing page so effective:
- The primary goal is clear – the goal of this email course is to sell an eBook. And that eBook is promoted at the very top of the page with an exclusive offer and a countdown timer to create a sense of urgency.
- Subscribers know exactly what they’re getting and how it will help them – the value proposition couldn’t be clearer and it’s the most prominent text on the page.
- Form fields are kept to a minimum – to reduce friction, subscribers are asked for their name and their email address, and that’s it. Nothing more, nothing less.
- It provides social proof – testimonials from happy, thankful subscribers are featured to make visitors feel confident that they’re making a good choice by subscribing too.
- A taster of an email is included – this shows subscribers exactly what they’ll be getting in their inbox and demonstrates the value they can expect over the duration of this 100-day course.
Step 8: Set your sequence live
Once you’ve got all of your components in place, it’s time to set your email course live.
To do this, you’ll need to enable the automated workflow you created in your email marketing platform. This will ensure your email sequence will be delivered to new subscribers.
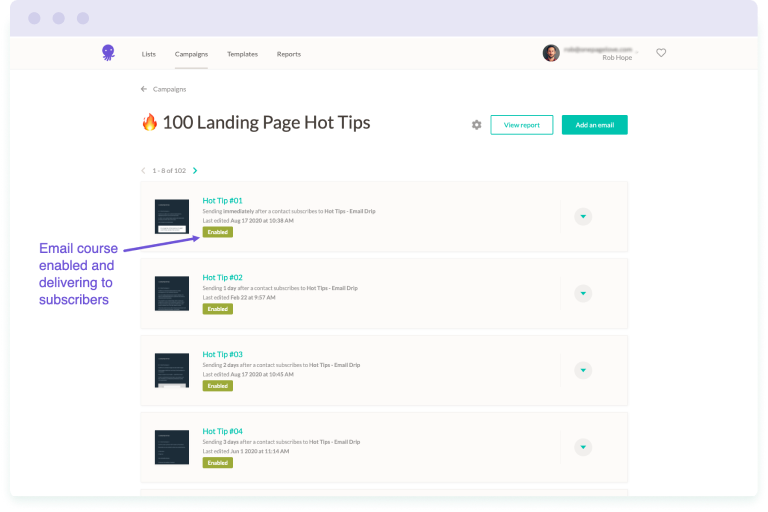
You’ll also need to set your opt-in form live on your website. Or it might be multiple forms, depending on how many web pages you plan to promote your email course as a lead magnet.
Once your emails and opt-in form are live, it’s worth testing that everything works correctly. Sign up for the email course yourself and check you receive the first email in the sequence.
Step 9: Promote your email course
Adding opt-in forms to your best performing web pages will ensure that website visitors know all about your email course.
But to increase your reach, promote your email course on other channels too. Your social media pages are a good place to start – add a link to your email course landing page in your business page bio (like Email Mastery does below). And schedule a series of posts to attract followers onto your course.
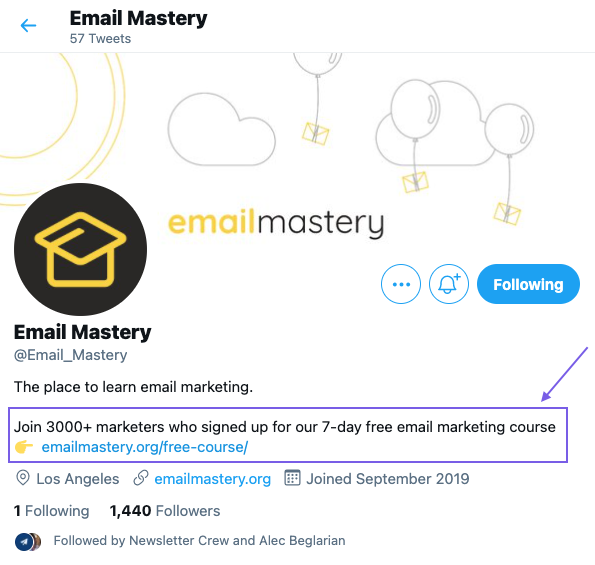
Getting a potential customer’s email address is highly valuable to your business and ongoing email marketing efforts. So you could also consider investing some money into promoting your email course further. Facebook is a good platform to reach your target audience without spending too much money. Though depending on your industry and niche, YouTube, Instagram and Twitter might also be good options.
Step 10: Pay attention to campaign performance
After your email course has been delivered in full to a few dozen subscribers, it’s important to check how the sequence is performing.
Some of the metrics you’ll want to look at include:
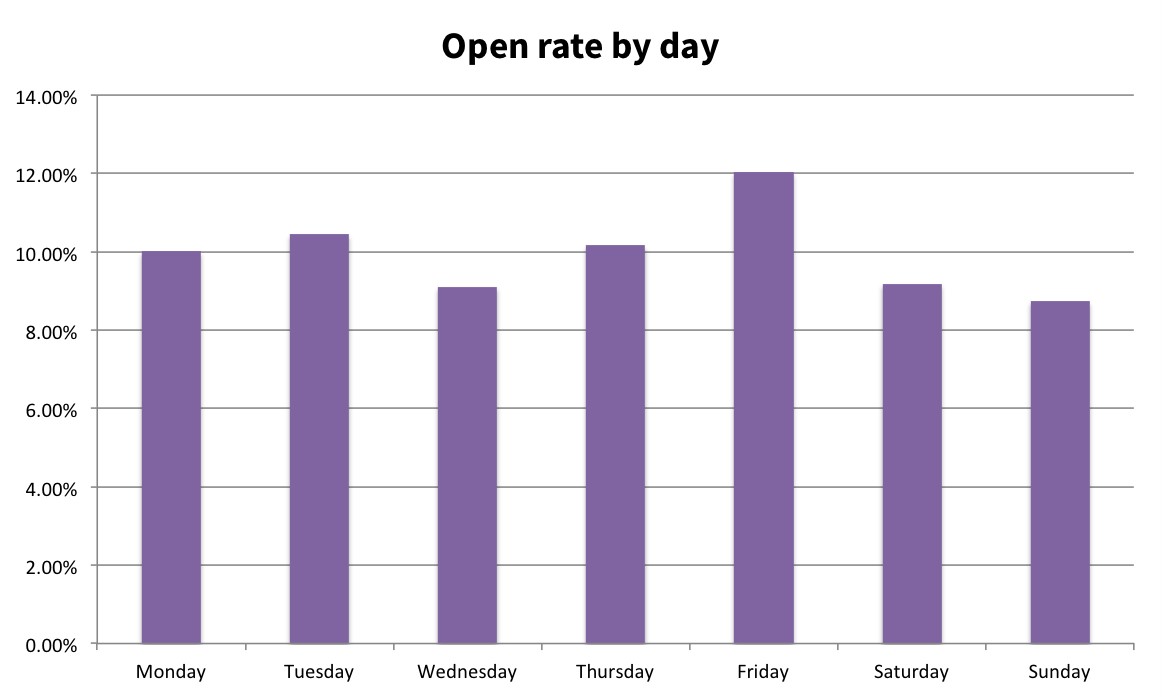
- Open rates – are subscribers sticking with the full sequence?
- Click rates – are subscribers engaging with your content?
- Unsubscribes – where are you losing subscribers in the sequence?
Pay close attention to where people are dropping off in the sequence. If you notice a spike in unsubscribes after one particular email, consider changing it – either rewrite the email to make it more useful or condense the content and merge it with another email in the sequence.
It’s expected that your open rate will drop off as the sequence continues. But if the drop off is dramatic, consider changing your subject lines. Or include a teaser in each email for what’s to come next – make subscribers feel excited to receive the next email in the sequence.
And if your click rates are dropping with each email, try out different CTAs.
Examples of email courses for inspiration
Before jumping into creating your own, check out our teardown of four email courses with tips on what to steal for your own. In this article, we go into more detail as to how Email Mastery, One Page Love and Patch Plants have created a winning email course that converts.
Wrapping up
An email course is an excellent lead magnet and a means by which to grow your mailing list. Done well, not only does an email course deliver value to your audience, it can also turn subscribers into customers by educating them on a topic relevant to your business and what you offer.
But to do an email course well, you need to invest time and consideration into the content. Choose a topic that not only resonates with your target audience, but also aligns with your business goals. After all, it needs to work for you and your business, not just your potential customers.
Follow the steps in this guide and you can’t go wrong.

No Comments
Leave a comment Cancel